Greek Dressing

Delicious Greek dressing. A keeper for sure!

Ingredients

  • 1/2 cup olive oil
  • 1/2 cup red wine vinegar
  • juice of one lemon
  • 4 cloves garlic
  • 1 tbsp dried oregano leaves
  • 1 tsp salt
  • 1/2 tsp black pepper

Directions

Add oil, vinegar and lemon juice to jar. Press 4 cloves into the jar. Add oregano, salt, black pepper. Shake vigorously to emulsify.

Chicken Lettuce Wraps Chopped Salad

2016-06-16 11.56.16Sorry this isn’t the best photo. I will try to replace it later with something more glamorous. But as a big part of this blog is to catalog the recipes that the family has deemed favorites, I want to get this UP.

To be perfectly honest, only the adult members of the family are gaga over this recipe, but both kids like it well enough. Tabby prefers to eat the chicken and dressing separate from the salad and add ranch or ceasar dressing (her faves) and Ben mostly just likes the chicken, but I think as they get a little older, they’ll come to love it like we do.

The original recipe comes from Skinny Taste and we make very few tweaks.

Ingredients:

SALAD DRESSING

  • 3 tablespoons rice vinegar
  • 1 1/2 tablespoons grapeseed or canola oil
  • 1 teaspoon sesame oil
  • 1 teaspoon honey
  • 
1 teaspoon grated fresh ginger
  • 1 clove garlic, minced
  • 1/8 tsp kosher 
salt and pepper

CHICKEN

  • 1/2 cup hoisin sauce
  • 2 tablespoons rice vinegar
  • 4 teaspoons Sriracha sauce (or more!)
  • 
4 tablespoons less sodium soy sauce
  • 
2 teaspoons grated fresh ginger
  • 2 pounds ground chicken
  • (2) 8 ounce cans water chestnuts, drained and diced
  • 1/4 cup chopped unsalted peanuts

SALAD

  • 6-8 cups of mixed lettuce, chopped
  • grated carrots (optional)
  • random additions like snow peas or chinese noodles (optional)


Directions

In a small bowl, whisk together the vinegar, oils, honey, ginger, garlic, and salt and pepper to taste to make dressing. Set aside.

In a medium bowl, whisk together the hoisin, vinegar, Sriracha, soy sauce, and ginger. Set aside. Heat a medium skillet over medium-high heat. Spray with cooking spray then add the chicken and cook until browned and cooked through, 8 to 10 minutes. Add the water chestnuts and peanuts to the pan. Pour the reserved hoisin mixture on top and cook for 1 to 2 minutes to heat through.

Remove from the heat and set aside. We like this very well when the chicken is fresh from the stove and even better when it’s been chilled in the fridge – very refreshing!

To serve, combine lettuces, carrots and any other additions. Top salad with chicken mixture and drizzle with dressing and toss.

Overnight Oats

2016-05-15 18.24.55

If you look at anything food related, particularly clean/healthy food related on the internets, you can’t help but have seen a post (or 100) about overnight oats. And it’s obvious why – they’re great. They allow you to make really quality food very quickly, so long as you do it early, and they are really really tasty. I’ve tried many, but here are my favorites, adapted from Marin Mama Cooks.

Ingredients

  • 1/4 C steel cut oats
  • 3/4 C almond milk (unsweetened)
  • 2 T chia seeds
  • 1/2 T maple syrup
  • pinch salt
  • 1/2 t vanilla extract
  • fresh fruit, cut in bite-sized pieces

Directions

Place oats, milk, chia seeds, maple syrup, salt and vanilla extract in a container with a lid. I use the wide-mouth pint mason jars. They’re cheap and sturdy. Give the the mixture a quick stir and top with the fresh fruit. I’ve done berries of all type, cherries and apples. They’ve all been delicious. Then place the jar in the fridge overnight.

Grab the jar the next morning on your way out the door and enjoy! You can also pop the jar in the microwave and heat for about 90 seconds for a warm breakfast.

And that’s it. Couldn’t be simpler!

Easy Korean BBQ Beef with Broccoli

2015-02-02 18.12.46I fully realize I’ve been rather terrible about posting new recipes. But really, maybe it’s just that I’ve been more selective. I’ve wanted to make sure that we really really LOVE something and it’s truly ingrained in our family dinner repertoire before I post it. But I have to say I was a little surprised I hadn’t already posted this. We make it very frequently. At least once a month. And for us, that’s huge.

The original recipe came from Damn Delicious, a favorite recipe blog. And her’s is amazing, so it was the foundation for this, but I always need to soup things up a bit, usually with VEGGIES and this was no exception. I also moved the heat out of the dish so adults could add it to taste later with some Sriracha and nixed some fat and sugar.

Ingredients

  • 2 lbs 93% lean ground beef
  • 6 cloves garlic, minced or pressed
  • 1 T sesame oil
  • 1/2 C brown sugar
  • 1/2 C soy sauce
  • 1/2 t ground ginger
  • 2 packages frozen broccoli (I like the kind that steams in the bag)
  • Sriracha for serving (optional)
  • rice for serving

Directions

Note: If you’re going to have rice with this, you probably need to get going on that before you ever start the beef because this is quick.

Start by browning the ground beef, breaking it into small pieces as you go. As that’s heating up, toss in your sesame oil and garlic cloves (I just push these through the press so I don’t have to fuss with them before I start). As the ground beef browns (you’ll have to stir it occasionally as you work), steam your broccoli in the microwave. Then combine the brown sugar, soy sauce and ginger in a small bowl. Whisk together.

As soon as the ground beef is brown, add the sauce and broccoli and stir to thoroughly combine. Allow to simmer for a couple of minutes and serve on top of your rice with as much or as little Siracha as you can handle.


2015-02-02 18.06.35This is by far one of the easiest things I cook. I can get it on the table in probably about 20 minutes. This is partially due to the fact that we love minute rice and that can cook alongside it in about the same time. Everyone in the family LOVES this.

Sriracha Salmon with Summer Squash Hash

2014-10-20 18.28.39

I like anything I can get on the table for my family in under 30 minutes that is healthy, real food. Salmon almost always fits that bill because it cooks quickly and needs very little adornment to make it special. This dish is no exception and is a really great addition to any week night warrior’s repertoire. Add my summer squash hash and it’s a full, healthy, very yummy meal with leftovers for lunch the next day.

Ingredients

For the salmon:

  • 2 pounds salmon cut into 4-6 oz pieces
  • 1 lime
  • 1 T Sriracha hot sauce
  • 2 T brown sugar
  • 1 t sea salt
  • 2-3 green onions, thinly sliced, for garnish

For the Summer Squash Hash:

  • 2 cups cooked rice (brown is our fave)
  • 3-4 summer squash (zucchini or yellow squash) cut small or julienned
  • 1 T butter
  • S&P or salt and lemon pepper or garlic salt or … ?

Directions

Heat oven to 425. Start your rice cooking. Heat water on the stove or turn on the rice cooker and get it going. Then prep your summer squash. We use the mandoline on the fine grate setting and turn over 4 squash in just a few minutes. This is a good time to slice the green onions as well.

Next, cover a baking sheet with parchment or foil and place the salmon pieces on top. Zest the lime over it. Then combine the lime juice, Sriracha, brown sugar and sea salt together in a small bowl. Drizzle over the salmon and place in the oven for 16 minutes. We found this is the perfect cook time for us, but if you have very thin salmon or like it more rare, you should probably check after 10 minutes.

Now, use the next 16 minutes to cook your summer squash and finish up your rice. Heat 1 T butter in a fry pan and add the summer squash. Saute for 8-10 minutes until a bit soft. Don’t move it around too much, you want to move some moisture and start to get it a little brown if you can. Season with your desired spices and combine with the rice.

Sprinkle green onions over salmon and serve atop your delicious hash. Enjoy!


2014-10-20 18.31.22Notes: we do not find this to be a particularly spicy dish, despite containing Sriracha. The fattiness of the salmon seems to cut it nicely. Also, hash is equally delicious deconstructed (with rice and squash not touching) if you happen to have picky eaters.


Avocado Chicken Burritos

2014-07-29 19.16.19The whole family is in agreement – it feels so so good to be back in the routine of cooking at home! The hours we spent in the car, going back and forth between our permanent neighborhood and our temporary neighborhood nearly every day, really took it out of us and home cooking was one of the big things we cut out. Well no more! We’ve had little besides home-cooked meals for the past few days and we’re all appreciating it very much.

These burritos are an amalgam of various recipes I’ve seen on the interwebs and others I’ve done before, but this combo turned out especially well. It made a lot of extra too and I froze some with avocado and some without, so we’ll see how that turns out.

Ingredients

  • 2 lg boneless skinless chicken breasts cooked about any way you like
  • 1 lg can pinto beans or about 3 cups cooked pintos
  • garlic salt
  • cumin
  • chili powder
  • about 1.5 cups of shredded cheese of your choice (colby jack, mozzarella, cheddar, queso fresco)
  • 2 ripe avocados
  • flour tortillas
  • oil/butter for browning (optional)
  • salsa, sour cream, etc. for serving (optional)

Directions

As a note, in this case, I slow-cooked a large packet of chicken breasts at the beginning of the week with some chicken stock for about 6 hours on low and then shredded them. I also have great success with dicing chicken breast, seasoning with S&P and browning over medium-high heat in a little olive oil. Pre-cooked from the deli meat or freezer sections would probably work great as well and I’d even try canned.

Heat chick and beans in a skillet over medium high heat. As they cook, season to taste with garlic salt, cumin and chili powder. Meanwhile, halve avocados and remove the pits. Slice in the skin in a grid-pattern and then scoop the newly-created chunks out with a spoon. Once the filling is hot, remove to a separate plate/bowl, clean out your skillet and heat it again over medium-high heat.

As the skillet heats, assemble the burritos. Take about 1/3 cup filling and lay it in a line in the center of the tortilla. Top with cheese (2-3T?) and avocado. I am thinking a squeeze of lime or maybe some chopped cilantro would be a nice addition as well. I’ll try that next time. Roll as you do with a burrito, pulling the sides in to seal the deal.

Next, place the little donkeys back in the skillet for browning. Some folks like to use a bit of oil or butter for this step and I must admit it’s tasty, but I usually omit it for health reasons, but if you’re feeling indulgent, give it a go. Heat/melt your oil/butter before you add the burritos. We can fit about 4 in our skillet and we lay the lid of one of our other smaller pans over the top to keep them smooshed down a bit. Cook for a couple of minutes then flip. This step makes a huge difference between pretty meh burritos and haute burrito cuisine (is there such a thing?? must be because I just said it. QED).

If you’re creating some frozen assets with the extras, skip browning and avocado (I’ll report back on that later) and wrap them tightly in foil before sticking them in a freezer bag. When you’re ready to heat, set your oven for 375 and place foil wrapped burritos inside for around 35-40 minutes. If you like, pull them out a couple of minutes ahead and give them the skillet treatment. It’s just that much better.

Mini Chicken Pot Pies

2013-09-10 11.59.12

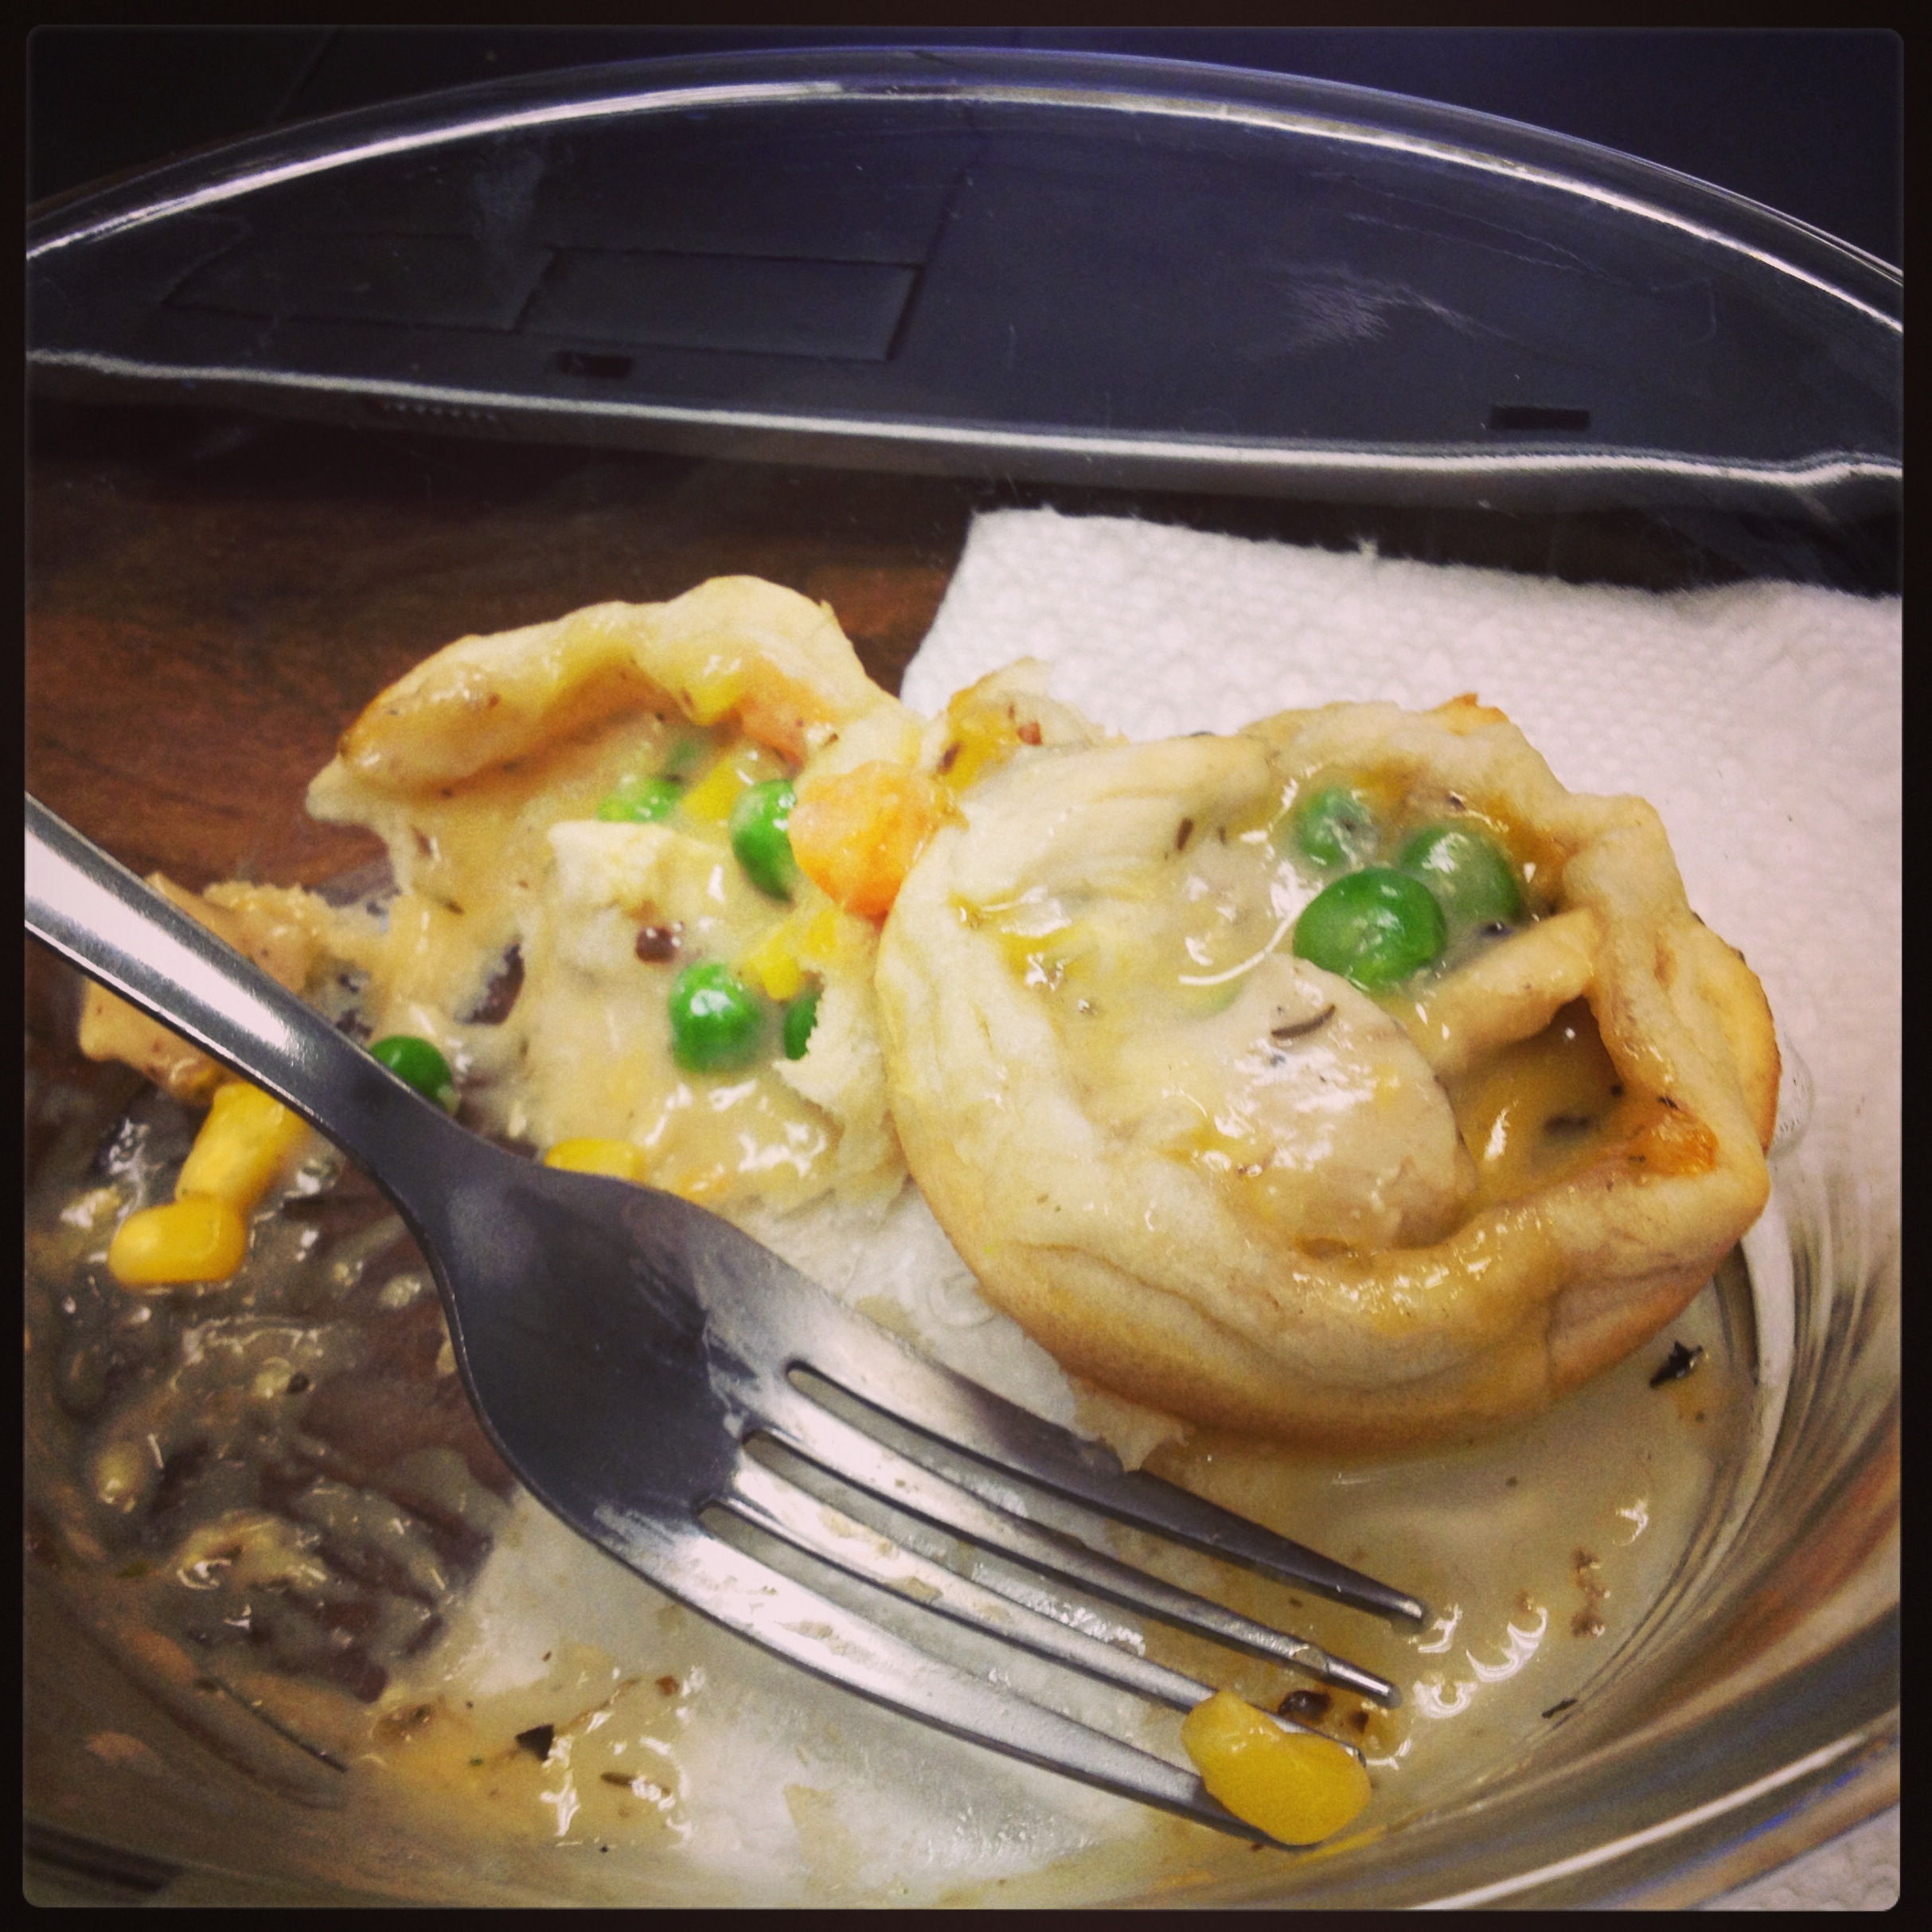
Right now, with life the way it is, I love any recipes that fit the following criteria: 1) healthy 2) kids love 3) quick and 4) freezable!! So when I saw a recipe for “Chicken Pot Pie Cupcakes” I had to try it. And fast forward 3 or 4 months, I actually did! I had to make some swaps and sometime later, maybe, when life isn’t quite as nuts, I’d love to swap the cream of soup for actual FOOD, but these are tasty and have veggies my kids are dying to eat, so not too shabby, even if it wouldn’t pass muster with Michael Pollan.

Mini Chicken Pot Pies

  • 2 cans of refrigerated biscuits – the ones I buy are 8 per package and somewhere around that mark should work
  • 3 cups cooked chicken breast, diced (see my note below about cooking chicken breasts for use in recipes)
  • 2.5 cups frozen mixed veggies
  • 2 cans cream of mushroom soup or this delighful DIY times 2
  • 1 cup 2% shredded cheddar
  • 1 tsp dried basil
  • 1 tsp dried thyme
  • onion powder
  • garlic powder
  • S&P

These are ridiculously easy to make. Heat the oven to 400.

Lightly oil (olive oil mister time!) the bottom of your muffin tins. Then take each biscuit from the can and split it in half so that you have two thinner hockey-pucks. Press each half biscuit into the sides and bottom of the muffin tins, making little pie crusts.

In another bowl, combine your chicken, soup (or alternative), veggies, cheddar, basil, thyme and onion powder and garlic powder to taste. Add salt if you need it (you probably don’t, thanks, Campbells!) and pepper also to taste. Spoon some of the mixture into each crust. I easily got 32 cupcakes out of my chicken mixture, but I suppose this could vary slightly. If you find you run out, you could add some more veggies.

Bake for 10-15 minutes and enjoy! If you have chicken that’s already cooked, you can have this in the oven (at least one tray) in 10 min or less. The leftovers are great for kiddo lunches, mommy and daddy lunches or freezing.

I got 32 of these out of the recipe. MyFitnessPal calculates them at around 125 calories apiece, a little heavy on the carbs, but otherwise quite healthy. Three is a very filling meal.

A word on cooking chicken: a lot of people encourage you to “poach” your chicken, basically cooking it in a shallow pan of water for 15 minutes. I find this to make chicken icky, oddly anemic looking and most importantly, flavorless. When I want cooked chicken for recipes (pizza, salads, pot pies), I dice it and then cook it with just a little olive oil and salt and pepper. I suppose it’s a smidge less healthy for you, but it is way more flavorful and very quick. Do an entire family pack at once and you can use it over the course of a week or freeze for easy meals later.

Sizzling Asian Steak Salad

sizzlingsteakI haven’t been great about posting recipes lately. It’s because I’ve been busy, not because I haven’t been cooking. We cook all the time. I think we have some sort of bizarre street cred at Ben’s school because he is always bringing semi-“bizarre” lunches. But I have resolved to continue putting up the recipes that our family enjoys the most for one little reason. Tabby asked me to.

Well she didn’t ask my specifically, but she said something to me a couple of weeks ago about teaching her how to cook and her being about to make food for herself when she leaves our house (she sometimes has strangely long-range planning for an almost-six-year-old). So I resolved to make sure I post the recipes that have caught our fancy and someday, I will make them into a book for the kids.

This recipe has been on our radar for a few months now. It comes to us from one of my favorite food bloggers, Iowa Girl Eats. It is changed VERY little because it is basically perfect as conceived, but I will adjust quantities and some instructions to reflect how we make it.

Sizzling Asian Steak Salad

Serves 4

Ingredients:

For the steak marinade:
1/4 C extra virgin olive oil
1/4 C  low-sodium soy sauce
2 T mirin (sweet Japanese cooking wine)
1 heaping T brown sugar
4 cloves garlic
24 oz strip steak, cut into bite-sized pieces

For the salad dressing:
1/4 C extra virgin olive oil
1/4 C low-sodium soy sauce
3 T honey
2 T lime juice
4 cloves garlic
2 teaspoons fresh ginger

For the salad:
1 small red onion, quartered and thinly sliced
12-16 cups baby spinach (or other lettuce)
1 pint grape or cherry tomatoes, halved
2 green onions, chopped

Directions:

This is a recipe made for the immersion blender! We stick all the ingredients for the marinade (except the steak, obviously) in a bowl and blend until smooth. It makes things super simple. But if you don’t have an iBlender, you can just grate or mince the garlic. Then you place the steak in a bag or a shallow dish and pour the marinade over it. 30 minutes or up to 2 hrs to marinate, stir halfway through. To make the dressing, you can do the same routine as the marinade. Place all ingredients in a bowl and iBlend or you will need to grate or mince the garlic and ginger and then whisk together or shake in a jar.

Once the steak is done marinating, heat a fry pan to medium high and then add the marinaded steak and onions. Saute for about 3-4 min per side (flank gets tough if you over-cook, so don’t!). Remove from pan and set aside. Combine salad greens, tomatoes and dressing (you will probably need less than 1/2 – just save the rest for next time) and toss until coated. Divide evenly amongst 4 plates, top with steak and green onions and ENJOY!

Chicken Stirfry Lettuce Wraps

Well April is almost done and so is my fourth cookbook, Great Food Fast. I have nothing but praise for this cookbook. I loved the full-color photos of EVERY recipe. I love the organization (by season!) and I loved the food. I actually tried EIGHT recipes from this (yay, made it!) book.

and for the finale … Chicken Stirfry Lettuce Wraps. Continue reading “Chicken Stirfry Lettuce Wraps”

Pasta with Salmon, Peas and Mint

I frequently get a surprised reaction when I reveal that my kids like fish, but they do, like a LOT. We are met with squeals of delight when we mention fish is on the menu. I like this kind of weird! So I knew it was a pretty done deal when I selected this recipe from Great Food Fast to try out. Salmon is instantly popular and add pasta to it? Slam dunk. That’s the right basketball metaphor isn’t it? I’m more sure of football: TOUCH DOWN!

As an added bonus, we got to use the fresh mint from our garden and I am always a fan of that. Matt is constantly threatening to eradicate my precious mint before it takes over the neighborhood, but I say he’s a spoil sport. But I figure I better use it while I can and it grows so fast I can harvest virtually all the mint I want and still have tons left over.

Pasta with Salmon, Peas and Mint
adapted from Great Food Fast

Ingredients

  • 1 pound short pasta (rotini, farfalle, cavatappi, elbow macaroni?)
  • 1.5 lbs salmon (skin removed)
  • juice and zest of 2 lemons
  • 10 oz frozen peas, defrosted
  • 2 T unsalted butter
  • 1/4 cup chopped fresh mint plus more for serving

Cook pasta according to al dente. Reserve 1 C pasta water and return to pot. Meanwhile, season salmon with S&P and place in a large skillet. Add a 1/4 cup of water and the lemon juice and zest. Bring to a boil over medium high heat and steam for 10 minutes. Add peas and steam until they are tender, 2-3 more minutes.

Combine salmon, peas and cooking water with the pasta. Add butter, mint and season with S&P to taste. Stir gently breaking the salmon into large flakes. Add reserved pasta water for desired consistency. Serve topped with a little extra mint if you like.


This was a great recipe and just as tasty leftover as it was the evening we first made it. The kids devoured it and asked for seconds. I would like next time to add just a little cheese, perhaps Parmesan or Romano or maybe feta? just to see how it would be.

Pasta with Salmon, Peas and Mint