Buffalo Shrimp Po’ Boys

buffaloshrimppoboyThese po’ boys originally came to me via Mother Thyme. Buffalo?! Shrimp?!? Sandwich?!? Yep, you got me. I had to bite.

I have no idea what the original recipe says. When I went to find the link, I didn’t even bother to look, because it’s now in my brain the way I make it and that’s what I’m sharing with you.

Ingredients

  • shrimp! peeled and defrosted – however many your family will eat and/or will provide adequate leftovers
  • buffalo sauce – maybe a cup or so? you need it for basting on the grill and drizzling on the sandwich – WE USE (and love!) FRANK’S
  • blue cheese crumbles
  • baby arugula
  • bread! You can use what you like, but in my opinion, crusty is good. Ciabatta has been really good for this, but you could use french bread, possibly bollio, or something else you prefer
  • butter
  • garlic salt
  • onion powder

Directions

Heat grill to medium. Prepare shrimp by peeling and defrosting as necessary. Thread on to skewers and brush with buffalo sauce. Prepare bread by splitting in the middle and cutting into sandwich size pieces if necessary. Then spread/brush with butter and sprinkle with garlic salt and onion powder.

Bring prepared shrimp skewers and bread to the grill. Grill shrimp skewers until they have changed color properly, about 2-3 min per side. Depending on the configuration of your grill, you can grill the bread at the same time, or you can do it once the shrimp are done. Go buttered side down and about 5 min if it’s on an upper rack (this is what we use) or only a minute or so if it’s on the main grilling surface.

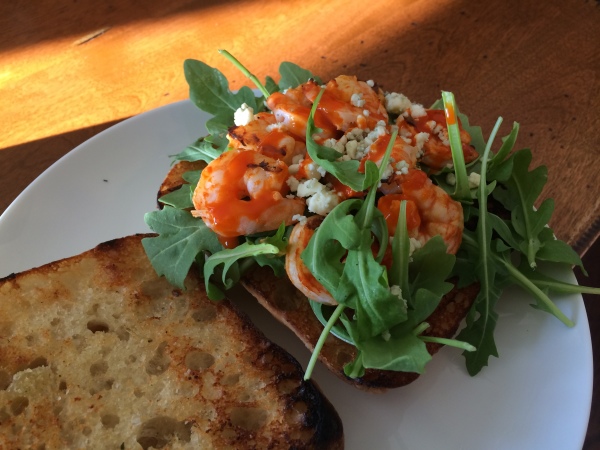
To assemble, layer arugula and a skewer and a half or so of shrimp on top of the grilled bread. Sprinkle with blue cheese crumbles and drizzle on more buffalo sauce, then add the top bread.


We’ve made these two or three times now and they are almost universally a big hit, at least with adults. The kids are wary of the spicy buffalo, so we leave that off for them and just give the shrimp a little S&P. They come together VERY quickly and I like that you don’t have to heat up the oven or stove to make them. They are a great picnic food and we’ve served them with our apple/cucumber slaw.

Apple Vanilla Muffins

2014-07-31 21.37.28Last Thursday, before our trip to Granby, I finally got to do some baking in the new kitchen. Baking at our temporary digs was incredibly infrequent and I’d missed it! It was nice to get in a well-functioning kitchen and whip these up for our trip. As a bonus, they are GOOD.

The original recipe came from Chocolate Chocolate and More (the original original recipe came from Busy Moms Recipe Box and was actually Vanilla Pear Muffins). For my purposes, I lightened it up a bit. I decided 4T of butter was plenty for that nice smooth texture and subbed more applesauce for the 1/4 C oil and added a special sprinkle.

Ingredients

1 1/2 cup all purpose flour
1 1/2 teaspoons baking powder
1/4 teaspoon nutmeg
pinch cardamom
pinch cinnamon
pinch salt
2 large eggs
2 teaspoons vanilla
1 cup packed brown sugar
4 tablespoons unsalted butter, melted
1 1/4 cup apple sauce
1-2 granny smith apples
vanilla sugar or plain granulated sugar for sprinkling

Directions

Heat oven to 400. Line or grease a 12-muffin tin.

In a medium mixing bowl, sift together dry ingredients (flower, baking powder, spices, salt). In a separate bowl, combine eggs, vanilla, brown sugar, melted butter and apple sauce. Combine the egg mixture with the dry mixture, being careful not to over mix.

Pour about 1/4 cup of batter into each muffin tin. Quarter and finely slice the apples and add 3-4 to the top of each muffin. Sprinkle with sugar and bake for 20 minutes.

2014-07-31 22.05.23I happened to have some vanilla sugar hanging around the house that we bought on some hipster voyage to the spice shop. I figured it would be perfect for sprinkling in this recipe, and so I used that instead of plain granulated sugar. It was very nice and added to the vanilla flavor of these. You can obtain vanilla sugar from a few sources, but you can also make your own by mixing the scrapings of a vanilla bean with about 6 cups of sugar. It’s nice, but I’m also sure it’s not necessary.

Avocado Chicken Burritos

2014-07-29 19.16.19The whole family is in agreement – it feels so so good to be back in the routine of cooking at home! The hours we spent in the car, going back and forth between our permanent neighborhood and our temporary neighborhood nearly every day, really took it out of us and home cooking was one of the big things we cut out. Well no more! We’ve had little besides home-cooked meals for the past few days and we’re all appreciating it very much.

These burritos are an amalgam of various recipes I’ve seen on the interwebs and others I’ve done before, but this combo turned out especially well. It made a lot of extra too and I froze some with avocado and some without, so we’ll see how that turns out.

Ingredients

  • 2 lg boneless skinless chicken breasts cooked about any way you like
  • 1 lg can pinto beans or about 3 cups cooked pintos
  • garlic salt
  • cumin
  • chili powder
  • about 1.5 cups of shredded cheese of your choice (colby jack, mozzarella, cheddar, queso fresco)
  • 2 ripe avocados
  • flour tortillas
  • oil/butter for browning (optional)
  • salsa, sour cream, etc. for serving (optional)

Directions

As a note, in this case, I slow-cooked a large packet of chicken breasts at the beginning of the week with some chicken stock for about 6 hours on low and then shredded them. I also have great success with dicing chicken breast, seasoning with S&P and browning over medium-high heat in a little olive oil. Pre-cooked from the deli meat or freezer sections would probably work great as well and I’d even try canned.

Heat chick and beans in a skillet over medium high heat. As they cook, season to taste with garlic salt, cumin and chili powder. Meanwhile, halve avocados and remove the pits. Slice in the skin in a grid-pattern and then scoop the newly-created chunks out with a spoon. Once the filling is hot, remove to a separate plate/bowl, clean out your skillet and heat it again over medium-high heat.

As the skillet heats, assemble the burritos. Take about 1/3 cup filling and lay it in a line in the center of the tortilla. Top with cheese (2-3T?) and avocado. I am thinking a squeeze of lime or maybe some chopped cilantro would be a nice addition as well. I’ll try that next time. Roll as you do with a burrito, pulling the sides in to seal the deal.

Next, place the little donkeys back in the skillet for browning. Some folks like to use a bit of oil or butter for this step and I must admit it’s tasty, but I usually omit it for health reasons, but if you’re feeling indulgent, give it a go. Heat/melt your oil/butter before you add the burritos. We can fit about 4 in our skillet and we lay the lid of one of our other smaller pans over the top to keep them smooshed down a bit. Cook for a couple of minutes then flip. This step makes a huge difference between pretty meh burritos and haute burrito cuisine (is there such a thing?? must be because I just said it. QED).

If you’re creating some frozen assets with the extras, skip browning and avocado (I’ll report back on that later) and wrap them tightly in foil before sticking them in a freezer bag. When you’re ready to heat, set your oven for 375 and place foil wrapped burritos inside for around 35-40 minutes. If you like, pull them out a couple of minutes ahead and give them the skillet treatment. It’s just that much better.

Mini Chicken Pot Pies

2013-09-10 11.59.12

Right now, with life the way it is, I love any recipes that fit the following criteria: 1) healthy 2) kids love 3) quick and 4) freezable!! So when I saw a recipe for “Chicken Pot Pie Cupcakes” I had to try it. And fast forward 3 or 4 months, I actually did! I had to make some swaps and sometime later, maybe, when life isn’t quite as nuts, I’d love to swap the cream of soup for actual FOOD, but these are tasty and have veggies my kids are dying to eat, so not too shabby, even if it wouldn’t pass muster with Michael Pollan.

Mini Chicken Pot Pies

  • 2 cans of refrigerated biscuits – the ones I buy are 8 per package and somewhere around that mark should work
  • 3 cups cooked chicken breast, diced (see my note below about cooking chicken breasts for use in recipes)
  • 2.5 cups frozen mixed veggies
  • 2 cans cream of mushroom soup or this delighful DIY times 2
  • 1 cup 2% shredded cheddar
  • 1 tsp dried basil
  • 1 tsp dried thyme
  • onion powder
  • garlic powder
  • S&P

These are ridiculously easy to make. Heat the oven to 400.

Lightly oil (olive oil mister time!) the bottom of your muffin tins. Then take each biscuit from the can and split it in half so that you have two thinner hockey-pucks. Press each half biscuit into the sides and bottom of the muffin tins, making little pie crusts.

In another bowl, combine your chicken, soup (or alternative), veggies, cheddar, basil, thyme and onion powder and garlic powder to taste. Add salt if you need it (you probably don’t, thanks, Campbells!) and pepper also to taste. Spoon some of the mixture into each crust. I easily got 32 cupcakes out of my chicken mixture, but I suppose this could vary slightly. If you find you run out, you could add some more veggies.

Bake for 10-15 minutes and enjoy! If you have chicken that’s already cooked, you can have this in the oven (at least one tray) in 10 min or less. The leftovers are great for kiddo lunches, mommy and daddy lunches or freezing.

I got 32 of these out of the recipe. MyFitnessPal calculates them at around 125 calories apiece, a little heavy on the carbs, but otherwise quite healthy. Three is a very filling meal.

A word on cooking chicken: a lot of people encourage you to “poach” your chicken, basically cooking it in a shallow pan of water for 15 minutes. I find this to make chicken icky, oddly anemic looking and most importantly, flavorless. When I want cooked chicken for recipes (pizza, salads, pot pies), I dice it and then cook it with just a little olive oil and salt and pepper. I suppose it’s a smidge less healthy for you, but it is way more flavorful and very quick. Do an entire family pack at once and you can use it over the course of a week or freeze for easy meals later.

Those Reeces Cookies

ReecesCookiesThis recipe is another payment in the “family cookbook” series. I’ve been collecting recipes for years and I publish and share them on this blog. A few years ago, I started designating some as “family recipes.” To garner this status the recipe must have been cooked by us at least a handful of times and judged to be superior in every way.

My efforts redoubled when a few months ago, my then-five-year-old daughter asked me how she would know how to cook all of her favorite things when she left for home. I was pleased that she asked the question and that even at her age, she has a special connection to cooking with us. It makes me feel like I’m doing my job right, that’s for sure.

These cookies were found on the internets (probably pinterest) and they are something else. They are in most ways a normal chocolate chip cookie, but the batter contains both peanut butter and pudding mix and that seems to make them a bit softer and more tender than your average chocolate chip cookie and very very tasty, especially with milk.

Those Reeces Cookies

adapted from Sweet Pea’s Kitchen

Ingredients

  • 2 1/4 C all purpose flour
  • 1 t baking soda
  • 1/2 t salt
  • 1 3.4 oz box instant vanilla pudding mix
  • 3/4 C unsalted butter, softened
  • 1/2 C creamy peanut butter
  • 1/2 C sugar
  • 1/2 C brown sugar
  • 2 lg eggs
  • 1 t vanilla extract
  • 1 T honey
  • 1 C Reece’s Pieces candy
  • 1/2 C chocolate chips

Heat oven to 350 and prepare two cookie sheets. Original instructions use parchment paper, but I don’t find this necessary. In a medium bowl, whisk together flour, baking soda, salt and pudding mix. In the bowl of a stand mixer, cream together butter, sugars and peanut butter until smooth. Add the eggs one at a time, making sure they are thoroughly combined after both additions. Add the honey and vanilla extract and scrape down the sides of the bowl if necessary. On low speed, add the flour and mix to combine. Again, scrape the sides of the bowl if necessary. Add Reece’s Pieces and chocolate chips and mix to combine.

Roll dough 1.5 inch balls and place a couple of inches apart on your cookie sheets. Bake at 350 for 10 minutes. Cookies will be starting to look just a little brown on top, but go ahead and take them out and let them cool on the cookie sheets for a couple of minutes and they will set. You don’t want to over cook them or they can become dry. VERY important!

They are incredibly wonderful with milk. mmmmmm

Crockpot Green Curry Chicken

greencurryThere is little I like better than coming home from work and having dinner waiting. And if it’s healthy, delicious food that the whole family likes? Purrrrfect. This meal really hits the sweet spot for us. I adapted theoriginal recipe comes from this post and it has quickly become a family favorite, especially for Miss Tabby, the impetus of this whole project.

Crockpot Green Curry Chicken

Ingredients

  • 2 lbs boneless skinless chicken breasts
  • 2 medium onions roughly chopped
  • one head of garlic, minced
  • 2 15 oz cans lite coconut milk
  • juice of 2 limes
  • 4 oz green curry paste (we use Thai kitchen)
  • 1/4 C brown sugar
  • 2 t salt
  • 1 t black pepper
  • 2 T cornstarch
  • 32 oz frozen stirfry vegetables
  • rice to serve if desired

Directions

This is a great spot to use the food processor if you’re so inclined. I take both onions, quarter them and toss them in the food processor with the cloves of garlic and pulse a few times. That makes prep pretty darn quick. Otherwise, chop, mince like normal.

Place the chicken in the bottom of the crockpot and throw the salt and pepper on it. Mix it up a bit. Then mix up the coconut milk, lime juice, curry paste, and brown sugar and pour it over the chicken. Cook on high for 4-5 hours.

About 30 minutes before you want to eat, stir in the frozen veggies. Also, this is a great time to start your rice!  Then mix the cornstarch with about 2 T water and then mix that into the curry. Continue to cook until the vegetables are warmed and the sauce thickens.

Serve yummy veggies and meat over a little rice. Mmmmmm


This has a little kick to it, kind of on the back side, but it’s not really spicy (i.e. both kids like it). You could definitely spice it up with some thai chiles if desired. In any case, it is

Sizzling Asian Steak Salad

sizzlingsteakI haven’t been great about posting recipes lately. It’s because I’ve been busy, not because I haven’t been cooking. We cook all the time. I think we have some sort of bizarre street cred at Ben’s school because he is always bringing semi-“bizarre” lunches. But I have resolved to continue putting up the recipes that our family enjoys the most for one little reason. Tabby asked me to.

Well she didn’t ask my specifically, but she said something to me a couple of weeks ago about teaching her how to cook and her being about to make food for herself when she leaves our house (she sometimes has strangely long-range planning for an almost-six-year-old). So I resolved to make sure I post the recipes that have caught our fancy and someday, I will make them into a book for the kids.

This recipe has been on our radar for a few months now. It comes to us from one of my favorite food bloggers, Iowa Girl Eats. It is changed VERY little because it is basically perfect as conceived, but I will adjust quantities and some instructions to reflect how we make it.

Sizzling Asian Steak Salad

Serves 4

Ingredients:

For the steak marinade:
1/4 C extra virgin olive oil
1/4 C  low-sodium soy sauce
2 T mirin (sweet Japanese cooking wine)
1 heaping T brown sugar
4 cloves garlic
24 oz strip steak, cut into bite-sized pieces

For the salad dressing:
1/4 C extra virgin olive oil
1/4 C low-sodium soy sauce
3 T honey
2 T lime juice
4 cloves garlic
2 teaspoons fresh ginger

For the salad:
1 small red onion, quartered and thinly sliced
12-16 cups baby spinach (or other lettuce)
1 pint grape or cherry tomatoes, halved
2 green onions, chopped

Directions:

This is a recipe made for the immersion blender! We stick all the ingredients for the marinade (except the steak, obviously) in a bowl and blend until smooth. It makes things super simple. But if you don’t have an iBlender, you can just grate or mince the garlic. Then you place the steak in a bag or a shallow dish and pour the marinade over it. 30 minutes or up to 2 hrs to marinate, stir halfway through. To make the dressing, you can do the same routine as the marinade. Place all ingredients in a bowl and iBlend or you will need to grate or mince the garlic and ginger and then whisk together or shake in a jar.

Once the steak is done marinating, heat a fry pan to medium high and then add the marinaded steak and onions. Saute for about 3-4 min per side (flank gets tough if you over-cook, so don’t!). Remove from pan and set aside. Combine salad greens, tomatoes and dressing (you will probably need less than 1/2 – just save the rest for next time) and toss until coated. Divide evenly amongst 4 plates, top with steak and green onions and ENJOY!

Crockpot Apples

It’s FALL! In addition to the fall colors and cool running weather, we have of course been chowing down on our share of “fall” foods. Pumpkin pasta, butternut squash, pumpkin pancakes, pumpkin oatmeal, pork ragu, tea and plenty of apples. With soups, in salads, for snacks. And on Sunday, we came home from Sunflower Market with an entire tote bag full  of apples because both Jonathan and Granny Smith apples were on sale! 49c/lb! We paid under $6 for a whole tote bag FULL of apples. Continue reading “Crockpot Apples”

Yogurt Cake

I think I might’ve mentioned that a couple of weeks ago, I read a book called Bringing Up Bebe, a comparison of French and American parenting. I really liked the book and enjoyed reading it and I was definitely intrigued by a passage in the book where a French woman was letting her 3 year old bake cupcakes … unassisted. And it hit me that Tabby can really do more than I let her. Granted, I let her do more in the kitchen than most other five-year-olds we know, but she is capable of more. It’s just because I’m a bit afraid of the mess. I’m the mom that makes the kids do playdough outside because I have no interest in cleaning all of those little bits up.

Anyhow, the book goes on to mention that most French children start out making yogurt cake when they’re around three. It is a neat idea because you use yogurt as part of the cake and then measure most of the rest of the ingredients with the empty yogurt containers. So I endeavored to be a bit less crazy and let Tabby and Ben have at it tonight.

Continue reading “Yogurt Cake”