Matzo Ball Soup

adapted from Budget Bytes

INGREDIENTS
1 lb chicken, cut into strips or bite-sized pieces
4 carrots, cut into thin rounds
4 ribs celery, halved lengthwise and diced
1 yellow onion, diced small
2 cloves garlic, ready to press or minced
8 cups chicken broth
sprigs of dill
olive oil
salt & pepper

3/4 cup matzo meal
3 T oil
3 large eggs
1 tsp salt
1/2 tsp baking powder
pepper

DIRECTIONS
Prep all your ingredients then start your matzo ball mix.

In a medium mixing bowl, whisk together eggs and oil. Then add meal, salt & baking soda. Combine to create consistent dough. Refrigerate for 25 minutes.

In a large soup pot, heat olive oil and add carrots, celery, onion & pressed or minced garlic. Saute for 5 or so minutes until the onion is translucent and soft. Season with salt & pepper.

Add a couple sprigs of dill and the chicken broth and bring to a boil. Once boiling, reduce heat and simmer for 20 minutes.

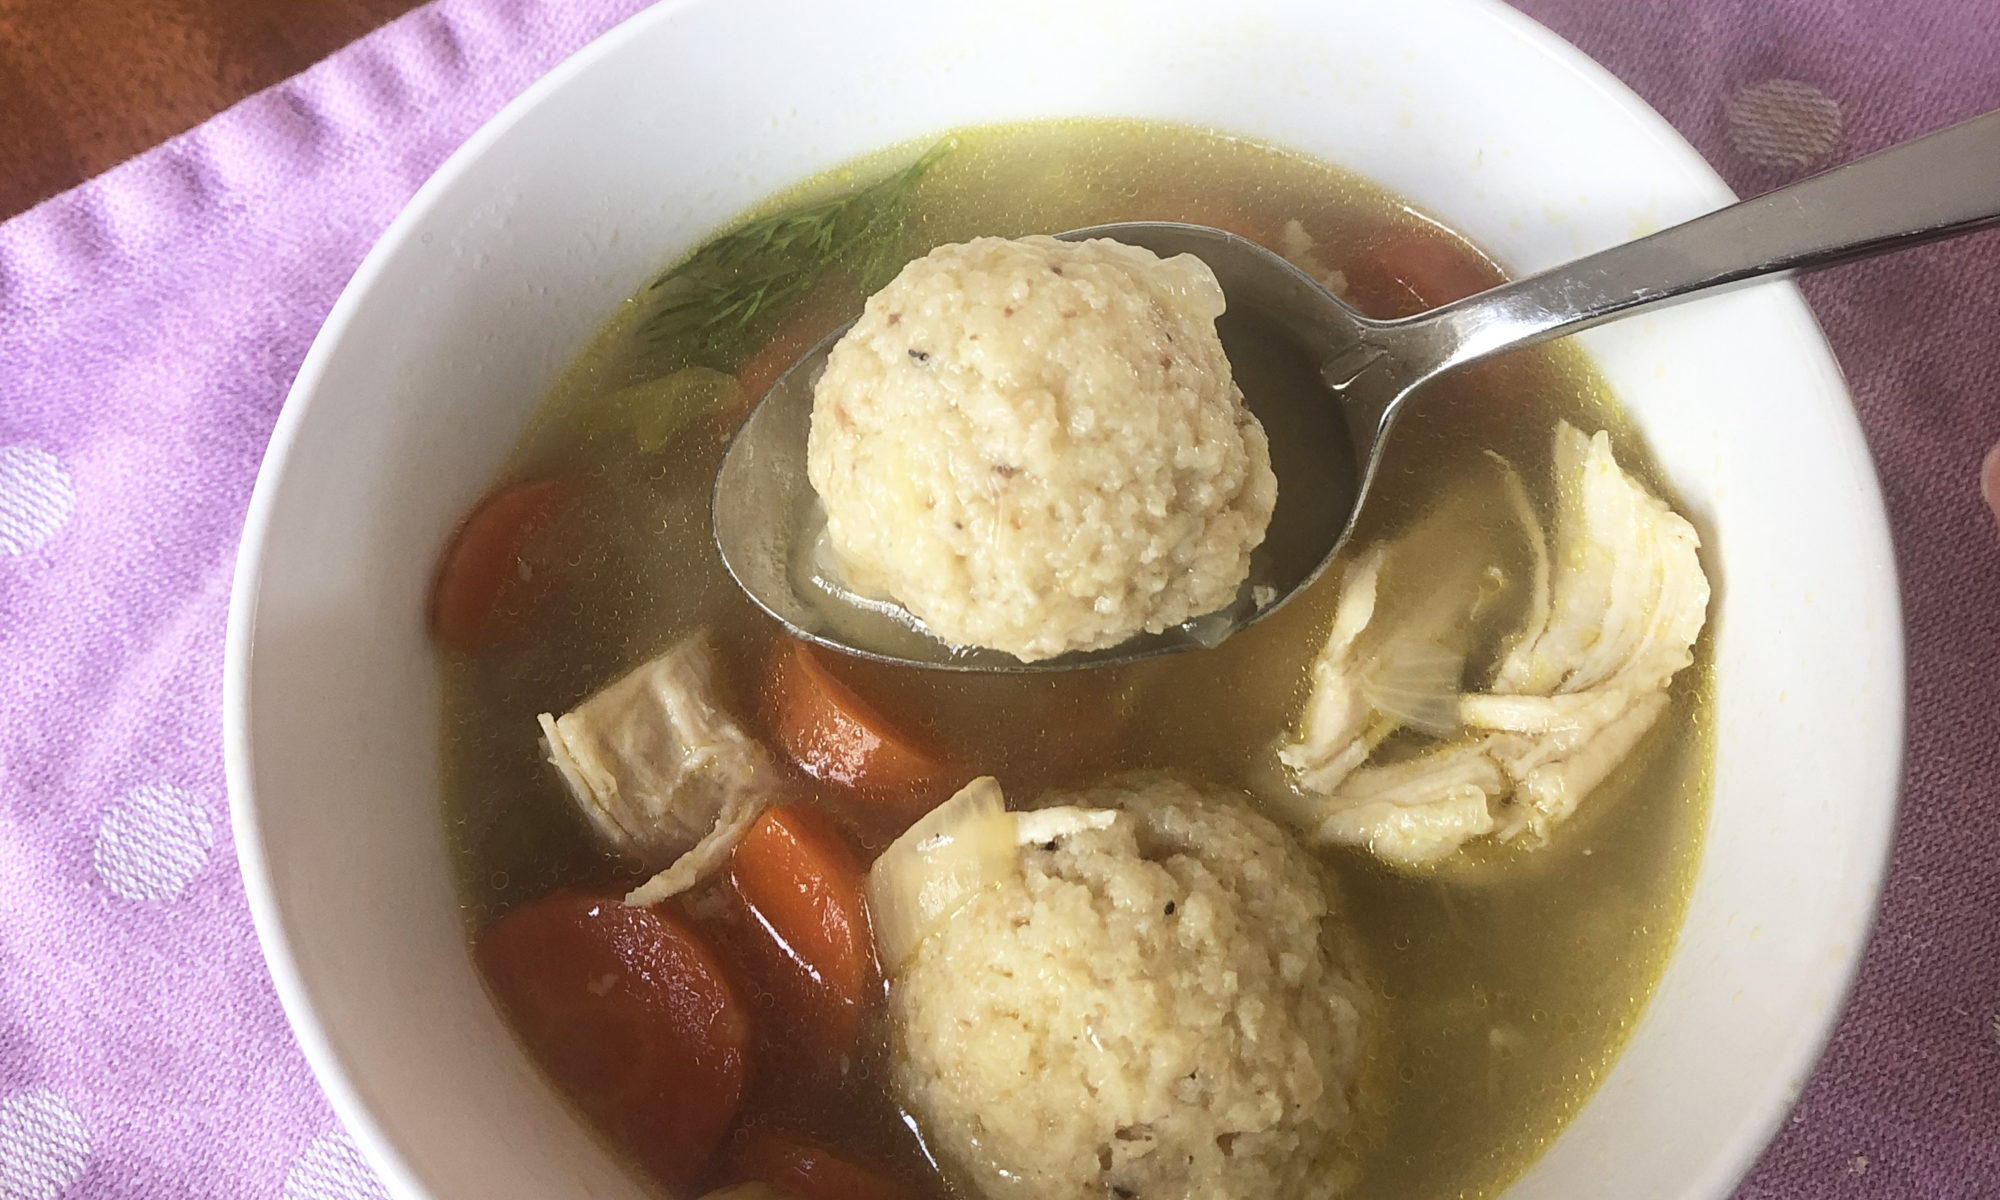
Once the 20 minutes are up, add your chicken strips to the soup and increase heat to medium. As the soup comes to temperature, make your matzo balls by rolling pinches of dough in your hands. They should be no larger than ping-pong ball sized. Keep in mind, they will expand as they cook! I like mine to be about 1.25 inches in diameter.

Once the soup is simmering, add in the matzo balls. Depending on their size, they will require about 15-20 minutes to cook which should give the chicken ample time to cook thoroughly as well without making it rubbery.

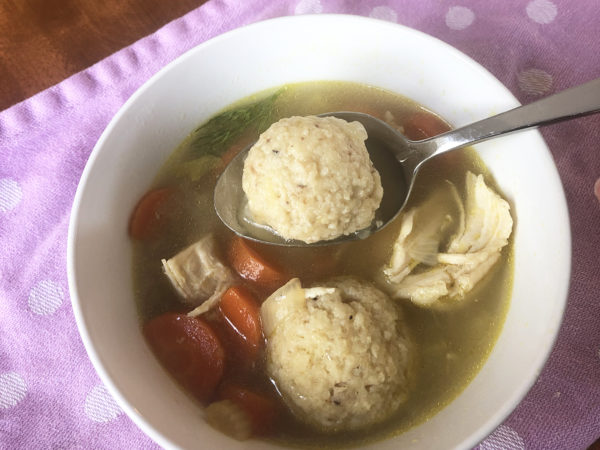
Add a sprig or two of dill to serve and ENJOY! Deeeeeelish.

Chicken Lettuce Wraps Chopped Salad

2016-06-16 11.56.16Sorry this isn’t the best photo. I will try to replace it later with something more glamorous. But as a big part of this blog is to catalog the recipes that the family has deemed favorites, I want to get this UP.

To be perfectly honest, only the adult members of the family are gaga over this recipe, but both kids like it well enough. Tabby prefers to eat the chicken and dressing separate from the salad and add ranch or ceasar dressing (her faves) and Ben mostly just likes the chicken, but I think as they get a little older, they’ll come to love it like we do.

The original recipe comes from Skinny Taste and we make very few tweaks.

Ingredients:

SALAD DRESSING

  • 3 tablespoons rice vinegar
  • 1 1/2 tablespoons grapeseed or canola oil
  • 1 teaspoon sesame oil
  • 1 teaspoon honey
  • 
1 teaspoon grated fresh ginger
  • 1 clove garlic, minced
  • 1/8 tsp kosher 
salt and pepper

CHICKEN

  • 1/2 cup hoisin sauce
  • 2 tablespoons rice vinegar
  • 4 teaspoons Sriracha sauce (or more!)
  • 
4 tablespoons less sodium soy sauce
  • 
2 teaspoons grated fresh ginger
  • 2 pounds ground chicken
  • (2) 8 ounce cans water chestnuts, drained and diced
  • 1/4 cup chopped unsalted peanuts

SALAD

  • 6-8 cups of mixed lettuce, chopped
  • grated carrots (optional)
  • random additions like snow peas or chinese noodles (optional)


Directions

In a small bowl, whisk together the vinegar, oils, honey, ginger, garlic, and salt and pepper to taste to make dressing. Set aside.

In a medium bowl, whisk together the hoisin, vinegar, Sriracha, soy sauce, and ginger. Set aside. Heat a medium skillet over medium-high heat. Spray with cooking spray then add the chicken and cook until browned and cooked through, 8 to 10 minutes. Add the water chestnuts and peanuts to the pan. Pour the reserved hoisin mixture on top and cook for 1 to 2 minutes to heat through.

Remove from the heat and set aside. We like this very well when the chicken is fresh from the stove and even better when it’s been chilled in the fridge – very refreshing!

To serve, combine lettuces, carrots and any other additions. Top salad with chicken mixture and drizzle with dressing and toss.

Peanut Sesame Sweet Potato Noodles

2016-05-15 18.40.50

I’ve had a spiralizer for maybe a year now. I was pretty excited by it when I first got it but I rapidly figured out that while I love zoodles (zucchini noodles), the rest of my household does not. I should have been pulling it out regularly to make myself zoodles for lunch, but I think I was kind of bummed.

Luckily, I spotted Organic Dietician’s recipe for Sesame Sweet Potato Noodles and I decided to give it a whirl. Who doesn’t love sesame noodles? It was a success, but it needed just a little tweaking to be perfect for me. Added bonus, Matt loves them too.

Ingredients

  • 2 medium to large sweet potatoes, peeled & spiralized
  • 1 T olive oil
  • 2 T no-sugar-added peanut butter
  • 1 T sesame oil
  • 2 T apple cider vinegar
  • pinch salt
  • 1 T sesame seeds
  • sliced green onion (for serving)
  • sriracha (for serving)

Directions

Place spiralized sweet potato in a microwave-safe bowl and drizzle about 1 T water in the bottom of the dish. Microwave 8-12 minutes depending on how cooked you’d like your sweet potato. I like mine with just a hint of crunch and so I go about 10 minutes.

Heat olive oil in a skillet and add noodles. Saute for about 5 minutes. This removes some excess water and makes them a bit more noodle like.

Meanwhile, whisk together peanut butter, sesame oil, vinegar and salt.

When noodles are cooked as desired, toss with dressing and top with sesame seeds and green onion & sriracha if desired.

These are great warm, but I like them even a bit better cold the next day.

Overnight Oats

2016-05-15 18.24.55

If you look at anything food related, particularly clean/healthy food related on the internets, you can’t help but have seen a post (or 100) about overnight oats. And it’s obvious why – they’re great. They allow you to make really quality food very quickly, so long as you do it early, and they are really really tasty. I’ve tried many, but here are my favorites, adapted from Marin Mama Cooks.

Ingredients

  • 1/4 C steel cut oats
  • 3/4 C almond milk (unsweetened)
  • 2 T chia seeds
  • 1/2 T maple syrup
  • pinch salt
  • 1/2 t vanilla extract
  • fresh fruit, cut in bite-sized pieces

Directions

Place oats, milk, chia seeds, maple syrup, salt and vanilla extract in a container with a lid. I use the wide-mouth pint mason jars. They’re cheap and sturdy. Give the the mixture a quick stir and top with the fresh fruit. I’ve done berries of all type, cherries and apples. They’ve all been delicious. Then place the jar in the fridge overnight.

Grab the jar the next morning on your way out the door and enjoy! You can also pop the jar in the microwave and heat for about 90 seconds for a warm breakfast.

And that’s it. Couldn’t be simpler!

Easy Korean BBQ Beef with Broccoli

2015-02-02 18.12.46I fully realize I’ve been rather terrible about posting new recipes. But really, maybe it’s just that I’ve been more selective. I’ve wanted to make sure that we really really LOVE something and it’s truly ingrained in our family dinner repertoire before I post it. But I have to say I was a little surprised I hadn’t already posted this. We make it very frequently. At least once a month. And for us, that’s huge.

The original recipe came from Damn Delicious, a favorite recipe blog. And her’s is amazing, so it was the foundation for this, but I always need to soup things up a bit, usually with VEGGIES and this was no exception. I also moved the heat out of the dish so adults could add it to taste later with some Sriracha and nixed some fat and sugar.

Ingredients

  • 2 lbs 93% lean ground beef
  • 6 cloves garlic, minced or pressed
  • 1 T sesame oil
  • 1/2 C brown sugar
  • 1/2 C soy sauce
  • 1/2 t ground ginger
  • 2 packages frozen broccoli (I like the kind that steams in the bag)
  • Sriracha for serving (optional)
  • rice for serving

Directions

Note: If you’re going to have rice with this, you probably need to get going on that before you ever start the beef because this is quick.

Start by browning the ground beef, breaking it into small pieces as you go. As that’s heating up, toss in your sesame oil and garlic cloves (I just push these through the press so I don’t have to fuss with them before I start). As the ground beef browns (you’ll have to stir it occasionally as you work), steam your broccoli in the microwave. Then combine the brown sugar, soy sauce and ginger in a small bowl. Whisk together.

As soon as the ground beef is brown, add the sauce and broccoli and stir to thoroughly combine. Allow to simmer for a couple of minutes and serve on top of your rice with as much or as little Siracha as you can handle.


2015-02-02 18.06.35This is by far one of the easiest things I cook. I can get it on the table in probably about 20 minutes. This is partially due to the fact that we love minute rice and that can cook alongside it in about the same time. Everyone in the family LOVES this.

Sriracha Salmon with Summer Squash Hash

2014-10-20 18.28.39

I like anything I can get on the table for my family in under 30 minutes that is healthy, real food. Salmon almost always fits that bill because it cooks quickly and needs very little adornment to make it special. This dish is no exception and is a really great addition to any week night warrior’s repertoire. Add my summer squash hash and it’s a full, healthy, very yummy meal with leftovers for lunch the next day.

Ingredients

For the salmon:

  • 2 pounds salmon cut into 4-6 oz pieces
  • 1 lime
  • 1 T Sriracha hot sauce
  • 2 T brown sugar
  • 1 t sea salt
  • 2-3 green onions, thinly sliced, for garnish

For the Summer Squash Hash:

  • 2 cups cooked rice (brown is our fave)
  • 3-4 summer squash (zucchini or yellow squash) cut small or julienned
  • 1 T butter
  • S&P or salt and lemon pepper or garlic salt or … ?

Directions

Heat oven to 425. Start your rice cooking. Heat water on the stove or turn on the rice cooker and get it going. Then prep your summer squash. We use the mandoline on the fine grate setting and turn over 4 squash in just a few minutes. This is a good time to slice the green onions as well.

Next, cover a baking sheet with parchment or foil and place the salmon pieces on top. Zest the lime over it. Then combine the lime juice, Sriracha, brown sugar and sea salt together in a small bowl. Drizzle over the salmon and place in the oven for 16 minutes. We found this is the perfect cook time for us, but if you have very thin salmon or like it more rare, you should probably check after 10 minutes.

Now, use the next 16 minutes to cook your summer squash and finish up your rice. Heat 1 T butter in a fry pan and add the summer squash. Saute for 8-10 minutes until a bit soft. Don’t move it around too much, you want to move some moisture and start to get it a little brown if you can. Season with your desired spices and combine with the rice.

Sprinkle green onions over salmon and serve atop your delicious hash. Enjoy!


2014-10-20 18.31.22Notes: we do not find this to be a particularly spicy dish, despite containing Sriracha. The fattiness of the salmon seems to cut it nicely. Also, hash is equally delicious deconstructed (with rice and squash not touching) if you happen to have picky eaters.


Mexican Sweet Potatoes

2014-09-09 17.23.15I had to post this recipe, because this is another one of those that has reached the vaunted “family favorite” status. I know, from the photo, it kind of looks like a hot mess, and even when I reveal the ingredients, you’ll probably think we’re nuts, but seriously, TRY IT. It hits all the right notes and when I serve this, EVERYONE licks their plate clean.

The original idea for this came from Iowa Girl’s Smothered Sweet Potato Fries and that recipe is AWESOME in its own right (it’s even got a great trick about stretching ground beef with mushrooms). But we like the health of the plain ol’ sweet potatoes and we so often have regular ol’ taco meat left over, I just usually use that.

Ingredients

  • 1 lb lean ground beef (soy crumbles? you decide)
  • 4 sweet potatoes
  • 1/2 C shredded cheddar
  • 2 avocados
  • taco seasoning (we use garlic salt, cumin and chili powder)
  • guacamole seasoning (garlic salt + cayenne pepper for us!)

Directions

Bake the sweet potatoes however you do … partial time in the microwave? Use your crockpot? Whatever works. We usually just shove them in a 350 oven on a cookie sheet lined with foil (they leak sweet potato juice, yo) for about an hour. They need to be tender.

Towards the end of sweet potato baking, brown the ground beef and season with the taco seasoning. Then halve the avocados, pull out their flesh and mash it in a bowl. We actually  have a mini-sized masher just for this job. It works swell. Season it as you do any old guacamole. We are very basic with the garlic salt and cayenne but I know lots of folks who do lime juice, onions, tomatoes, salsa, siracha, and on and on.

Once the potatoes are baked, halve them and mash on a plate to form a nice bed of sweet potato. Top with taco meat, cheddar cheese and let it melt a bit (you can nuke it if you don’t have enough residual heat from meat/potato). Then serve with the guacamole.

It’s filling, satisfying and pretty darn good for ya!

Buffalo Shrimp Po’ Boys

buffaloshrimppoboyThese po’ boys originally came to me via Mother Thyme. Buffalo?! Shrimp?!? Sandwich?!? Yep, you got me. I had to bite.

I have no idea what the original recipe says. When I went to find the link, I didn’t even bother to look, because it’s now in my brain the way I make it and that’s what I’m sharing with you.

Ingredients

  • shrimp! peeled and defrosted – however many your family will eat and/or will provide adequate leftovers
  • buffalo sauce – maybe a cup or so? you need it for basting on the grill and drizzling on the sandwich – WE USE (and love!) FRANK’S
  • blue cheese crumbles
  • baby arugula
  • bread! You can use what you like, but in my opinion, crusty is good. Ciabatta has been really good for this, but you could use french bread, possibly bollio, or something else you prefer
  • butter
  • garlic salt
  • onion powder

Directions

Heat grill to medium. Prepare shrimp by peeling and defrosting as necessary. Thread on to skewers and brush with buffalo sauce. Prepare bread by splitting in the middle and cutting into sandwich size pieces if necessary. Then spread/brush with butter and sprinkle with garlic salt and onion powder.

Bring prepared shrimp skewers and bread to the grill. Grill shrimp skewers until they have changed color properly, about 2-3 min per side. Depending on the configuration of your grill, you can grill the bread at the same time, or you can do it once the shrimp are done. Go buttered side down and about 5 min if it’s on an upper rack (this is what we use) or only a minute or so if it’s on the main grilling surface.

To assemble, layer arugula and a skewer and a half or so of shrimp on top of the grilled bread. Sprinkle with blue cheese crumbles and drizzle on more buffalo sauce, then add the top bread.


We’ve made these two or three times now and they are almost universally a big hit, at least with adults. The kids are wary of the spicy buffalo, so we leave that off for them and just give the shrimp a little S&P. They come together VERY quickly and I like that you don’t have to heat up the oven or stove to make them. They are a great picnic food and we’ve served them with our apple/cucumber slaw.

Avocado Chicken Burritos

2014-07-29 19.16.19The whole family is in agreement – it feels so so good to be back in the routine of cooking at home! The hours we spent in the car, going back and forth between our permanent neighborhood and our temporary neighborhood nearly every day, really took it out of us and home cooking was one of the big things we cut out. Well no more! We’ve had little besides home-cooked meals for the past few days and we’re all appreciating it very much.

These burritos are an amalgam of various recipes I’ve seen on the interwebs and others I’ve done before, but this combo turned out especially well. It made a lot of extra too and I froze some with avocado and some without, so we’ll see how that turns out.

Ingredients

  • 2 lg boneless skinless chicken breasts cooked about any way you like
  • 1 lg can pinto beans or about 3 cups cooked pintos
  • garlic salt
  • cumin
  • chili powder
  • about 1.5 cups of shredded cheese of your choice (colby jack, mozzarella, cheddar, queso fresco)
  • 2 ripe avocados
  • flour tortillas
  • oil/butter for browning (optional)
  • salsa, sour cream, etc. for serving (optional)

Directions

As a note, in this case, I slow-cooked a large packet of chicken breasts at the beginning of the week with some chicken stock for about 6 hours on low and then shredded them. I also have great success with dicing chicken breast, seasoning with S&P and browning over medium-high heat in a little olive oil. Pre-cooked from the deli meat or freezer sections would probably work great as well and I’d even try canned.

Heat chick and beans in a skillet over medium high heat. As they cook, season to taste with garlic salt, cumin and chili powder. Meanwhile, halve avocados and remove the pits. Slice in the skin in a grid-pattern and then scoop the newly-created chunks out with a spoon. Once the filling is hot, remove to a separate plate/bowl, clean out your skillet and heat it again over medium-high heat.

As the skillet heats, assemble the burritos. Take about 1/3 cup filling and lay it in a line in the center of the tortilla. Top with cheese (2-3T?) and avocado. I am thinking a squeeze of lime or maybe some chopped cilantro would be a nice addition as well. I’ll try that next time. Roll as you do with a burrito, pulling the sides in to seal the deal.

Next, place the little donkeys back in the skillet for browning. Some folks like to use a bit of oil or butter for this step and I must admit it’s tasty, but I usually omit it for health reasons, but if you’re feeling indulgent, give it a go. Heat/melt your oil/butter before you add the burritos. We can fit about 4 in our skillet and we lay the lid of one of our other smaller pans over the top to keep them smooshed down a bit. Cook for a couple of minutes then flip. This step makes a huge difference between pretty meh burritos and haute burrito cuisine (is there such a thing?? must be because I just said it. QED).

If you’re creating some frozen assets with the extras, skip browning and avocado (I’ll report back on that later) and wrap them tightly in foil before sticking them in a freezer bag. When you’re ready to heat, set your oven for 375 and place foil wrapped burritos inside for around 35-40 minutes. If you like, pull them out a couple of minutes ahead and give them the skillet treatment. It’s just that much better.

Mini Chicken Pot Pies

2013-09-10 11.59.12

Right now, with life the way it is, I love any recipes that fit the following criteria: 1) healthy 2) kids love 3) quick and 4) freezable!! So when I saw a recipe for “Chicken Pot Pie Cupcakes” I had to try it. And fast forward 3 or 4 months, I actually did! I had to make some swaps and sometime later, maybe, when life isn’t quite as nuts, I’d love to swap the cream of soup for actual FOOD, but these are tasty and have veggies my kids are dying to eat, so not too shabby, even if it wouldn’t pass muster with Michael Pollan.

Mini Chicken Pot Pies

  • 2 cans of refrigerated biscuits – the ones I buy are 8 per package and somewhere around that mark should work
  • 3 cups cooked chicken breast, diced (see my note below about cooking chicken breasts for use in recipes)
  • 2.5 cups frozen mixed veggies
  • 2 cans cream of mushroom soup or this delighful DIY times 2
  • 1 cup 2% shredded cheddar
  • 1 tsp dried basil
  • 1 tsp dried thyme
  • onion powder
  • garlic powder
  • S&P

These are ridiculously easy to make. Heat the oven to 400.

Lightly oil (olive oil mister time!) the bottom of your muffin tins. Then take each biscuit from the can and split it in half so that you have two thinner hockey-pucks. Press each half biscuit into the sides and bottom of the muffin tins, making little pie crusts.

In another bowl, combine your chicken, soup (or alternative), veggies, cheddar, basil, thyme and onion powder and garlic powder to taste. Add salt if you need it (you probably don’t, thanks, Campbells!) and pepper also to taste. Spoon some of the mixture into each crust. I easily got 32 cupcakes out of my chicken mixture, but I suppose this could vary slightly. If you find you run out, you could add some more veggies.

Bake for 10-15 minutes and enjoy! If you have chicken that’s already cooked, you can have this in the oven (at least one tray) in 10 min or less. The leftovers are great for kiddo lunches, mommy and daddy lunches or freezing.

I got 32 of these out of the recipe. MyFitnessPal calculates them at around 125 calories apiece, a little heavy on the carbs, but otherwise quite healthy. Three is a very filling meal.

A word on cooking chicken: a lot of people encourage you to “poach” your chicken, basically cooking it in a shallow pan of water for 15 minutes. I find this to make chicken icky, oddly anemic looking and most importantly, flavorless. When I want cooked chicken for recipes (pizza, salads, pot pies), I dice it and then cook it with just a little olive oil and salt and pepper. I suppose it’s a smidge less healthy for you, but it is way more flavorful and very quick. Do an entire family pack at once and you can use it over the course of a week or freeze for easy meals later.